What is an anchor pattern? How do you add one to a surface, and what is it used for?
The anchor pattern or anchor profile is a series of “peaks and valleys” that exist on a substrate. This anchor profile is extremely important to coatings, like paint or powder coating. Each coating has an optimal anchor pattern that allows maximum adhesion of the coating to occur.
If you apply a protective coating to a surface without etching the specified anchor pattern, the coating can fail prematurely, or excessive coating must be applied.
Anchor Pattern Profile and Coatings
To see the anchor pattern of a surface, you must look at it at a microscopic level — usually 200x magnification. Metallic surfaces have an anchor profile before they are sandblasted. The beginning anchor profile of metal surfaces Is uneven, and the necessary peaks and valleys that are required for coating adhesion don’t exist yet. That’s why surfaces are “roughed” – or abrasive blasted before coating application.
The type of peaks and valleys that are produced by abrasive blasting will vary, depending on the blast media being used, the distance from the blasting gun to the surface, and the pressure of the blasting equipment.
Most coating manufacturers have a recommended anchor profile for each coating. This is measured in units called mils.
How are Mils Measured
- 1 mil = 1/1000 of an inch
- 25 microns = 1 mil
- 39 mils = 1 millimeter
Anchor patterns are measured by the depth of the valleys (indentations) in mils. Most anchor patterns range from 3 mils half a mil.
| Anchor Pattern | Abrasive Media Type and Size |
|---|---|
| .5 mil | 100 mesh garnet, 120 mesh aluminum oxide, G-120 steel grit, 120-150 olivine |
| 1 mil | 80 mesh garnet, 100 mesh aluminum oxide, G-80 steel grit, 35-70 olivine |
| 1.5 mil | 36 mesh garnet, 36 mesh aluminum oxide, G-50 steel grit, 35-70 olivine |
| 2 mil | 36 mesh garnet, 36 mesh aluminum oxide, G-40 steel grit, 32 olivine |
| 2.5 mil | 36 mesh garnet, 24 mesh aluminum oxide, G-25 steel grit, 30-60 olivine |
| 3 mil | 16 mesh garnet, 16 mesh aluminum oxide, G-16 steel grit, 30-60 olivine |
These figures are calculated for abrasive blasting on mild steel, with a 90 PSI nozzle pressure, about 2 feet from the surface. Abrasive media sizes can vary, and tolerance of 10% either way should be maintained wherever abrasives are reclaimed and re-used.
Reclaimed abrasives should have an angular shape, and be free from oil, grease and contaminants.
How the Anchor Pattern Affects Coating Adhesion
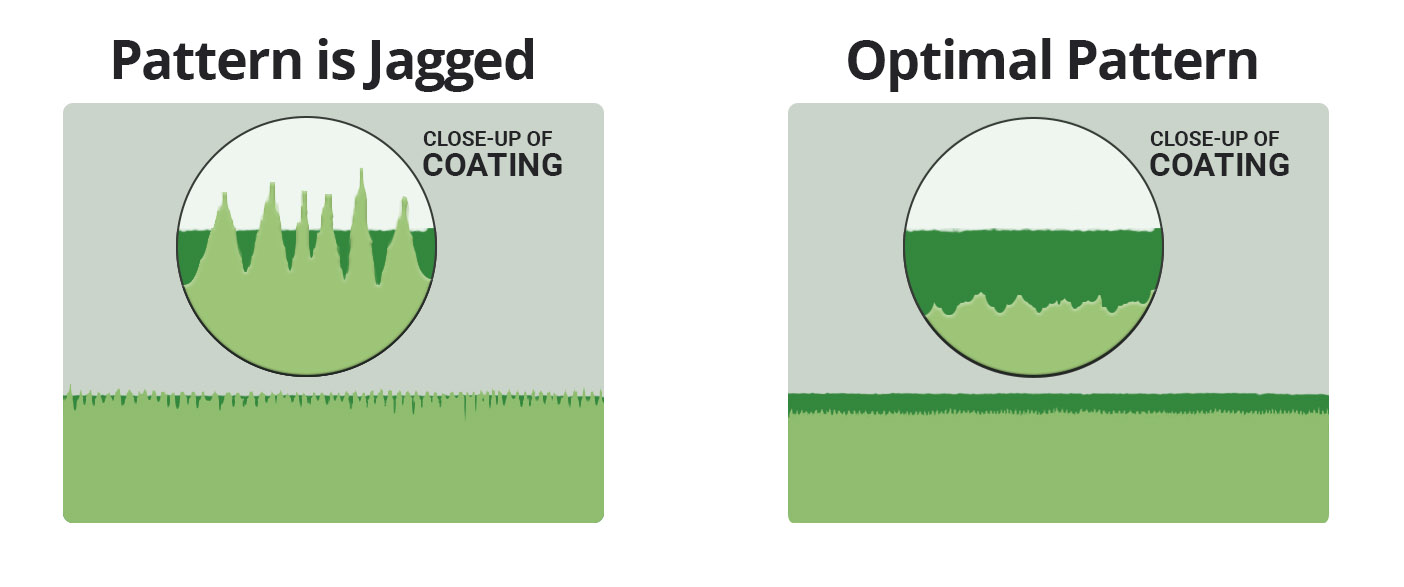
If the valleys in the anchor profile are too deep, the peaks will protrude above the layer of coating. This causes poor bonding, and can cause the coating to deteriorate before it’s time. When you have an etch pattern that is too deep, the only ways to correct it are to:
- Re-blast the surface with the correct media size and type, resulting in more time spent on the process.
- Applying extra layers of coating to compensate for the more pronounced peaks and valleys, adding more cost to the project.
If the anchor pattern is too shallow, the paint or coating will not have anything to latch onto, and the coating will fail over time. The smoother the anchor profile, the easier it is to remove, because there is no “grip”.
Checking the Profile of Blasted Surface
Replica tape is a widepread method for checking the anchor profile of a surface, though digital surface profile gauges are commonly used today.
Surface comparators may also be used to visually assess the anchor profile of a blasted surface. The comparators allow you measure the height of the major peaks relative to the major valleys, and are ISO 8503-1 compliant.
Other standards for measuring the anchor profile exist. ASTM D7127 is a standard that measures the positive and negative vertical deviations from a mean line using a portable stylus or gauge. ASTM D4417-11 measures the anchor pattern using three methods: a comparator that measuring peak to valley ratio as in ISO 8503-1, a gauge to measure depth, and composite tape or replica tape that provides a mirror of the anchor profile.
Discussing the Mils of Wet and Dry Coating
Whenever possible, follow the instructions for the anchor profile provided by the coating manufacturer. If you don’t have access to the technical documents, follow this general rule.
The mils of the anchor pattern you are creating on the blasted surface, should be 25—30% of the dry film thickness of the total coatings system, but not greater than the dry film thickness of the primer coat, unless you are applying more coating layers right afterwards.
The wet mils of a coating is different than the dry mils of a coating. Coatings have a tendency to shrink after drying. How much they shrink will depend on the percentage of solids in the particular coating. The anchor pattern you create while abrasive blasting should be more shallow than the total coatings after drying.
Best Practices for Anchor Patterns
When you blast a metal surface down to white or near white-metal, you should paint or coat the surface quickly, so flash rusting does not occur.
If the anchor pattern is too deep for the coating, the peaks of the metal surface tend to stick out above the surface of the coating. These can develop rust or corrosion, a phenomenon known as “pitting”.
Another drawback of creating valleys that are too deep in your anchor profile is the permeation of moisture. No coating or paint is completely resistant to moisture, weather, or chemicals. If the profile “valleys” are too deep, the dry film may not fill the valleys 100%. These pockets in the substrate that are not filled with the paint or coating may attract moisture, causing blisters in the coating.
Many industrial coatings (paint especially) require multiple layers to properly cling to the prepared surface, and offer protection from wear and tear over time.
Consult the technical documentation for your coating to get the optimal mils and anchor pattern, to ensure your coatings endure to their maximum lifespan.


